February 2007 Archives

One of the concepts that people need to understand when they begin to work with Team Foundation Server Version Control is that of the Team Foundation Server (TFS) Workspace. So I thought I would write a series of blog-posts covering the basics of TFS workspaces, with this post being the first. This information may be a little basic to many of the people who read my blog (especially this first post) and it is just a write up of how I think about workspaces and how I explain the concept to others. If you have any additional information to add or comments to make then please do.  Also, if you are new to TFS then you probably want to take a read of the help documentation over at MSDN and in the Teamprise User Guide as there is some great information there on this topic.

Ok.  One of the first problems people have with workspaces is that the term is a little overloaded – this is especially true to users of the Teamprise plug-in for Eclipse as an Eclipse “Workspace” is an entirely different entity that, though related, has very different functions to the TFS workspace.

Conceptually, I like to think of a TFS workspace as a container that bridges the gap between your local computer (acting as a TFS client) and the server.

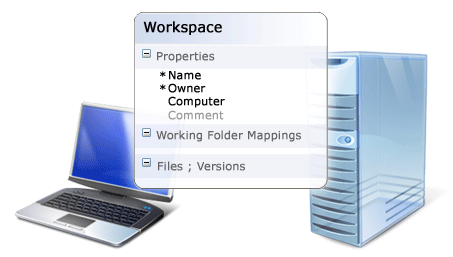
A TFS Workspace contains several important bits of information. A workspace is identified by its name and its owner. The workspace name can be up to 64 characters in length, and the name must be unique for a given owner. The workspace also contains the hostname of the computer that the workspace is associated with and there is room for you to give your workspace a comment (a good idea when you have multiple workspaces so you can remind yourself what they are for). A workspace also contains the working folder mappings – the links between your computer’s hard drive and the TFS version control repository. You can also picture the workspace as the way in which the TFS server keeps track of which files you have downloaded, what versions of those files you have and which ones you have pending changes and / or locks against in your local file system.

By using workspaces to remember files and versions downloaded TFS can use this information to massively optimize the network traffic between your computer and the TFS server. When you ask the server to “Get Latest”, it already knows what versions you have of everything so it can simply send you what has changed. This is one of the design decisions that the team at Microsoft took to optimized for distributed teams working over wide area networks. The TFS workspaces is therefore a central piece in ensuring two of the key principles in the way TFS Version Control behaves:-

  • Only send the information between server and client that you need to send
  • Only do this when I tell you to

However, to get the benefit of this reduced network traffic, you have one very important price to pay.

  • Talk to TFS when you do something to a file or folder that is in version control

TFS does some neat tricks with workspaces to keep them up-to-date. If somebody renames a file in source control then your local file gets renamed when you do a “Get Latest”. If someone deletes a file, then your local copy gets deleted when you do the “Get”. This way, you are not left with old stale files on your local hard drive like you do when using VSS or CVS etc.

Speaking of "Get Latest", when you do a “Get Latest” a few things happen. Any versions of files that you do not yet have are downloaded and placed into the directories you told it to put them in when you created a working folder mapping. Those files are then marked as read-only in the local file system. To edit a file, you must check the file out.

Check out behaviour diagram

When you do a check out, what you are actually doing is saying “TFS, I would like to edit the version of the file that I have already downloaded, is that ok?” TFS then looks at that version, and tells you if you can edit it or not (based on your security permissions at that point in time and if anyone else has placed a lock on the file). If you can edit the file, the TFS marks the file as read/write on your local machine and allows you to proceed.

When you have finished editing, you check-in the file. Before the code is committed to the server, the server looks at what version you had locally (by looking in your workspace) and compares this with the latest version on the server. If someone else has edited that file since the last time you did a “Get Latest” into your workspace then the server will ask you what to do with that conflicting edit.

Once you get to the position that you have no conflicts in the list of pending changes that you wish to commit, you can then check-in your code and it will get committed to the source code repository as a new changeset.  The server also updates its record of your workspace to say that you already have this new version of the file locally.

In summary, TFS workspaces are the way in which the server can keep track of which versions of what files you have on a given machine, where you have them on that machine and what changes you are in the process of making. 

Hopefully, you can start to see some implications of the way in which TFS workspaces are used by the server.  For example, if you un-mark a file as read/write, edit it and then do a "Get Latest" on that file then it will not be replaced with the latest version from the server (because you never told the server you were messing with that file so it assumes it you didn't).  In that scenario you would want to use the "Get Specific..." option to force a get of the file - but we'll cover all this type of stuff later on.  That is enough for now. As I say, In future posts we will look in more detail at working folder mappings, things that users frequently do that confuse TFS and how to use TFS workspaces to maximise your productivity helping you to get the best out of the excellent version control facilities provided by TFS.  I hope this post proves useful for someone.

Teamprise @ EclipseCon 2007

EclipseCon 2007Just wanted to mention that Corey (my boss) will be presenting at EclipseCon 2007 in Santa Clara on March 6th.  Usually when I do my Teamprise demo's people there have seen the Team Explorer interface inside Visual Studio before and they are usually convinced of the benefits of TFS so they just tend to be super impressed to see it all implemented seamlessly inside Eclipse.  I suspect that Corey's audience will be learning more about about TFS and the fact that we provide the Eclipse view into TFS will kinda be transparent to most folks.

Anyway, if you are at EclipseCon then consider dropping by Corey's talk  - as well as doing the demo he may well have some interesting news to announce that week...

Accessing Microsoft Visual Studio 2005 Team Foundation Server from Eclipse

Presenter: Corey Steffen
Duration: 50 minutes
Date: Tuesday, March 6, 2007
Time: 3:30 pm
Location: Room 207

conference website

Bluetooth Logo Today, I received a fancy new Microsoft Wireless Notebook Presenter 8000 mouse courtesy of Microsoft.  This is a Bluetooth enabled mouse with some useful extra buttons for slide advance and a built in laser pointer when presenting.  It is a nice mobile mouse that, while not without flaws, I would still recommend.  Anyway, I wanted to use my Dell's built-in Bluetooth model (the Dell Wireless 350 Bluetooth Module) rather than the supplied Microsoft Bluetooth USB dongle.  It was then that I noticed my Bluetooth wasn't working properly under Vista - when I searched for new devices, it just wasn't finding any.

I had a bit of a search around, and people were suggesting all sorts of nasty hacks.  In the end, I came across the new official Dell drivers that were posted on the 26th January 2007 so I'm making this post to hopefully get caught in the search indexes and help out a few other fellow early adopters.  To download the Dell Wireless 350 drivers for Windows Vista - visit the official Dell site.  The install flashes the Bluetooth chipset and installs all the stuff necessary to get your Bluetooth up and running.  I also downloaded the Reliability update for USB stack in Windows Vista 32-bit (KB925528) (not sure if I needed to or not, it just sounded like a good thing) and the latest version of Microsoft excellent IntelliPoint software.

One of the things I've always enjoyed about Windows 2000 -> Windows XP -> Windows Vista is that no matter how much the UI changes, some shortcuts just seem to stay around allowing me to quickly navigate around the system.  One that has survived is right clicking on My Computer and then selecting "Manage" - which takes you to an MMC console with most of the commonly used snap-ins pre-loaded.  However, one I used a lot more has disappeared.  I used to to right-click on the "My Network" shortcut in the start menu and select "Properties".  That would take me to the network connections wizard.  In Vista it takes me to the Network and Sharing Center screen (possibly helpful for my Dad, but not what I was after).Network and Sharing Center

From the dialog, you can press "Manage network connection" and it takes you to the good old network connections dialogNetwork Connnections dialog in Windows Vista

However, I wanted a quick way to access this from my keyboard, so I used a tactic I've found I've been doing a lot with Windows Vista - I create a shortcut to it that I placed in my Programs menu.  The trick was to find the control panel file responsible for this dialog.  After a bit of digging I tracked it down to be "%SystemRoot%\System32\ncpa.cpl".

Here is a screenshot of my shortcut settings in case you want to do the sameNetwork Connection shortcut settings

Changeset based Build Numbering

| 9 Comments

Here at Teamprise we've recently changed our build numbering scheme.  We use the traditional Major.Minor.Revision.Build approach with Major.Minor.Revision being the only thing an end user should care about and Major.Minor the only thing we would every do any marketing for.  The build number used to be an integer that incremented everytime we did a build.  On day one it started at 1 (i.e. 1.0.0.1) and when we got to the final 2.0 build it was 2058 (i.e. 2.0.0.2058). 

Internally, we have several different build types.  For example, we have a build for development which runs really fast but is missing steps like code obfuscation.  The "Release Build" is the build that compiles, generates documentation and obfuscates all the code just as we would distribute it to customers and would performs all of the automated tests etc.  Release Builds are the ones that our internal QA folks use to test against.  We used to label when we made a build so that we could tie that build to the exact versions of all the files included in it.

During a development cycle we typically update the versions we use to develop with fairly regularly (we use Teamprise to develop Teamprise, what is commonly referred to as dogfooding).  Every month or so we issue a preview releases to brave customers who have asked for a particular feature so that they can test them and let us know how we are getting along.  When the time comes to ship we flag a certain release build as our "release candidate" and then we start to hammer it as much as we can, trying to break it.  We also ship these release candidates to customers who want them.  We build up a list of bugs or features we would like to fix and then we triage them to decide which ones we will fix before we ship.  We then fix, re-build and test until we are happy with a release candidate and then we release it.  Typically we have 2 or 3 release candidates before we have a release we will sign off on.

Finally, when we decide which version is our RTM build (release-to-manufacture) we branch our mainline of code to create a branch for that release.  In Team Foundation Server you can create a branch from set of labeled files so this works well.  We can in effect branch after the fact, once we know what our shipping version was.  Development for the next version carries on in trunk.  If we find an issue or a bug that needs a fix applied to the previous release we can fix it in that branch and merge the changes into trunk.

Then we had a brain-wave.  I'm not sure exactly who's idea this was in the team, I think possibly several of us had it at the same time - and googling around this idea isn't particularly original.  Anyway, we now use the last changeset number for the $/Teamprise path in our Team Foundation Server code repository as the build number. We then append on to this a one letter code for the build type (for example, looking at the build server the latest release build is 2.1.0.5113R where R stands for Release). 

In Team Foundation Server, the changeset number is an incrementing number that gets assigned to every transaction of change to the version control system.  Each changeset number therefore represents a precise state of the files in version control on that server instance.

The advantage of this is that if I want to get the source code that exactly matches the state of play at the time of that build I can do a Get Specific... and ask for changeset 5113.  Additionally, I can lookup changeset 5133 in TFS and get the exact time and date that this change was made.  Also - if I want to compare the differences between builds this becomes trivial (again by knowing the changeset numbers).  It also means that we do not have to create labels for every build.  While labeling in TFS is fairly cheap, no point doing it if we don't have to.

Anyway.  I am so taken with the changeset build numbering approach that I thought I would mention it here.  While we happen to be building JAR files for our Java code, the same process can easily be applied to .NET assemblies etc.  I'm also going to be modifying the CruiseControl.NET integration to TFS to make versioning based on changeset numbers easier.  Stay tuned for details.

The Vista Aero interface is awesome - but capturing that beauty has always been hard for me.  All that changed this morning when Jeff Atwood put me on to an awesome tool by Kenny Kerr. Kenny Kerr's Windows Clippings 1.5 is simply the best capture tool for Windows Vista that I have used.  I am probably the last person in the world to hear about it, but on the off-chance that I am the second to last, here are some of the things I like and why you should use it:-

  1. It can capture shadows, transparency etc really well.  However, it can magically take out all the cruft that you get from background windows coming through.
  2. When you are doing a screen capture - the effect that is used while you are selecting the windows is suitably beautiful for a capture tool that takes such nice pictures.
  3. Screen shots are saved in a file name using the window name of the application you were taking a screenshot of.

It does one thing and does it really, really well.  Thanks Jeff for the top tip!  For a little user-guide on how to use Kenny's excellent tool see his post (with pretty pictures) here.

Archives

Creative Commons License
This blog is licensed under a Creative Commons License.