Recently in Git Category

Over the past couple of weeks I’ve had several people ask me about my dev environment for working with Git on Windows so I decided to write it up here for me to point people to. Of course the first thing that you want is Visual Studio 2013 with the built in Git tooling. While I’m obviously very biased in terms of the Visual Studio tools I’m actually more familiar with the command line workflow – especially coming from the Mac. However the team specifically designed the Visual Studio tools to work well with the command line and compliment them – I find myself swapping more and more between the command line and the UI depending on what’s quickest for me. I NEVER use the command line for merging any more, but I still use if for dealing with multiple remotes (very common in OSS workflows) squashing and rebasing my commits etc. There are some things I actually find myself using Visual Studio for that I never thought I would. For example I quite often find myself swapping my email address around when I’m doing commits for work or if I’m working on a demo or a side project and I’ve noticed I’ve been using the Git settings panel in Team Explorer more and more rather than going to “git config” which surprised me.

So, how do I set up my command line Git experience?

First of all you have to install Git for Windows of course.  I always use the .exe installer from here (ignore the –preview moniker, they are good – at the time of writing the latest is Git-1.8.5.2-preview20131230.exe). Now one of the first mistakes I see people do is go for the default options in the installer which results is people using Git Bash. If you love yourself don’t do that, but make sure Git is added to your path. On the screens that I need to make decisions on, I always follow this path.

For component selection, I generally go for the defaults. I don’t use the shell extensions personally but they don’t hurt.

image

This is the important one being the change to make sure Git is added to your Path. This makes sure that you can go to the command shell or PowerShell and run Git. The Git Bash shell is evil IMHO, I never find myself using it despite using Bash all the time when I’m on *nix.

image

Then I go with the default of setting the CRLF behaviour to normalize as Unix style endings in the commits.  Basically this makes sure a commit generated on Windows is the same as one done on the Mac or on Linux but also that you can still use notepad if you check out a file that was edited in Vim on Linux.

image


At this point you now have Git installed. Congratulations!  However, you can do better than that…

Enter PoshGit

The next thing I install is PoshGit. I swear, PoshGit is the main reason to use the PowerShell console (that and also the fact it doesn’t shout at you when you accidentally type “ls” instead of “dir”) Installation of PoshGit can be a bit quirky but Keith’s instructions are pretty good. Basically, after he’s helped you make sure your PowerShell environment is set up correctly, you clone the repo (git clone https://github.com/dahlbyk/posh-git.git), cd into it and then run the install script.

I always use Git over HTTPS rather than SSH so I often don’t have Putty installed with Paegent to handle my keys. Therefore I tend to just comment out the Start-SshAgent -Quiet line in \posh-git\profile.example.ps1. If you are seeing the error “WARNING: Could not find ssh-agent” when you start PowerShell and you don’t need SSH then just open up profile.example.ps1 in notepad, scroll down to the end of the file and make sure it looks like this:

   ...

Enable-GitColors

Pop-Location

# Start-SshAgent -Quiet


Remembering Passwords

Next up I install Andrew Nurse’s credential helper, git-credential-winstore. If you are talking to a Git server that requires a username and password, rather than having to type your credentials all the time this nifty little helper will actually store them securely in the Windows Credential Manager.  Note that when installing you’ll see an error if you’ve gone for the middle option when setting your path in Git for Windows because Git.exe isn’t on your path (Git.cmd is).  Therefore you are going to want to:

  1. Download it from CodePlex and save it to your disk
  2. In a command / powershell window, cd into your Downloads folder
  3. Install the credential helper by typing:

git-credential-winstore.exe -I "C:\Program Files (x86)\Git\bin\git.exe"

Combined with with web interface in TFS, Visual Studio 2013 and Eclipse with egit, that’s all I need personally. However if you want a graphical view of your repository then a lot of people use gitk which is installed with Git for Windows (just type “gitk” inside your repo in the command shell / powershell windows).  You can also type “git gui” for the git-gui tools.  Other popular graphical tools you might want to install are GitHub’s free app GitHub for Windows and Atlassian’s free app SourceTree.  GitHub for Windows is very pretty and great for managing your GitHub based repos. Atlassian’s SourceTree is very highly regarded as stand-alone UI for working with Git repos on Windows.

If you want to work with your local Git repositories in some .NET code then LibGit2Sharp is your friend.  It’s the open source library used by the Visual Studio Tools for Git and gives you a very idiomatic way to talk to Git from C# or VB.NET.  I thought it would be worth a quick tutorial post showing how easy it is to get started by querying a repository helping us learn a bit about the library but also learn more about Git itself. As LibGit2Sharp is open source in this example I’m going to point to cloned copy of the repository I have locally already by using the Git tooling in Visual Studio or by typing git clone https://github.com/libgit2/libgit2sharp.git. However you can obviously point to any Git repository you already have locally.

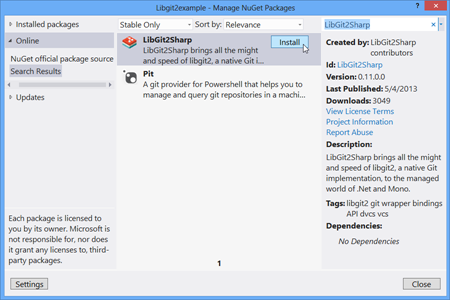
To begin, create a new console project in Visual Studio. We need to add a reference to the Lib2Sharp library and the quickest way to do that is to open the NuGet package manager by right-clicking on your project in Solution Explorer and select Manage NuGet Packages…  Search online for “LibGit2Sharp” and Install.

NPM to install LibGit2Sharp

Then accessing an existing repo is trivial, simply use the LibGit2Sharp.Repository class. A handy way to get a particular commit is by its hash if you know it.

      public static void Main(string[] args)
      {
         
using (var repo = new Repository(@"D:\source\LibGit2Sharp"
))
          {
             
Commit commit = repo.Lookup<Commit>("73b48894238c3e9c37f9f3a696bbd4bffcf45ce5"
);
             
Console.WriteLine("Author: {0}"
, commit.Author.Name);
             
Console.WriteLine("Message: {0}"
, commit.MessageShort);
          }
      }

But what if we just want the commit that’s the latest of the current branch, in Git-speak we want the “Tip” of “Head”. LibGit2Sharp gives you an easy way to get to the Head through the repository object. So we can do the following:

    public static void Main(string[] args)
      {
         
using (var repo = new Repository(@"D:\source\LibGit2Sharp"
))
          {
             
Commit
commit = repo.Head.Tip;
             
Console.WriteLine("Author: {0}"
, commit.Author.Name);
             
Console.WriteLine("Message: {0}"
, commit.MessageShort);
          }
      }

A point in time in the repository is represented by a Commit. Each Commit points to a Tree which you can think of as a directory/folder. A Tree can contain a Blob (i.e. the contents of a file) or another Tree (i.e. a sub-folder).

So if you want to list the contents at the root of the repository then you can do

        foreach(TreeEntry treeEntry in commit.Tree)
        {
           
Console.WriteLine("Path:{0} - Type:{1}"
, treeEntry.Path, treeEntry.TargetType);
        }

That will give you something like the following when against the LibGit2Sharp repository

Path:.gitattributes - Type:Blob
Path:.gitignore - Type:Blob
Path:.gitmodules - Type:Blob
Path:.mailmap - Type:Blob
Path:.travis.yml - Type:Blob
Path:CHANGES.md - Type:Blob
Path:CI-build.msbuild - Type:Blob
Path:LICENSE.md - Type:Blob
Path:Lib - Type:Tree
Path:LibGit2Sharp.Tests - Type:Tree
Path:LibGit2Sharp.sln - Type:Blob
Path:LibGit2Sharp - Type:Tree
Path:README.md - Type:Blob
Path:ResharperSettings.xml - Type:Blob
Path:UpdateLibgit2ToSha.ps1 - Type:Blob
Path:build.libgit2sharp.cmd - Type:Blob
Path:build.libgit2sharp.sh - Type:Blob
Path:build.libgit2sharp.x64.cmd - Type:Blob
Path:libgit2 - Type:GitLink
Path:nuget.package - Type:Tree
Path:square-logo.png - Type:Blob

To see which files changed in a particular commit.  To do that we need to find the diff between the commit and it’s parent. For now let’s just assume that we have a single parent (i.e. we’re not a merge commit). Therefore we can do this

        Tree commitTree = repo.Head.Tip.Tree;
       
Tree
parentCommitTree = repo.Head.Tip.Parents.Single().Tree;

       
TreeChanges
changes = repo.Diff.Compare(parentCommitTree, commitTree);

       
Console.WriteLine("{0} files changed.",changes.Count());

And finally to iterate over the changes to show what files changed in that commit

        foreach(TreeEntryChanges treeEntryChanges in changes)
        {
           
Console.WriteLine("Path:{0} +{1} -{2} "
,
                    treeEntryChanges.Path,
                    treeEntryChanges.LinesAdded,
                    treeEntryChanges.LinesDeleted
                );
        }

That then gives the following output

Author: nulltoken
Message: Release LibGit2Sharp v0.11
3 files changed.
Path:LibGit2Sharp.Tests\DiffTreeToTreeFixture.cs +35 -11
Path:LibGit2Sharp.Tests\LibGit2Sharp.Tests.csproj +1 -0
Path:LibGit2Sharp.Tests\TestHelpers\OdbHelper.cs +17 -0

This post obviously just scratches at the surface of what is possible with LibGit2Sharp. We’re starting the process of trying to flesh out the documentation for the project from the current starting position of none, but it the meantime if you want to see some more examples of using LibGit2Sharp then take a look at the Unit Tests.

Source Code: Commit1.cs

Archives

Creative Commons License
This blog is licensed under a Creative Commons License.