January 16, 2008
TFS Top Tip #15 - Baseline your Builds
Microsoft Team Foundation Server 2008 has a great new improved build system (often referred to as "Team Build"). An advantage of running your build from Team Build is that (by default) all changes between your current build and the last good one are reported in the build report and any work items that were associated with those changesets are automatically updated with the build number they were fixed in.
However, when demonstrating this feature - the following thing always catches me out and is important to remember when using Team Build in production. The very first time you run a build, it does not associate that build with changesets or update any work items.
Therefore, the first time your create a new build definition you should manually run a build and make sure it is successful.
In fact I would recommend you do this anyway, even if the changeset association thing wasn't the case, after all you need to test that the new build definition you created actually works!
The reason why Team Build 2008 works in this way is that when Team Build successfully completes a build it stores the label applied to that last good build. The next time it runs a build that is successful it will compare the two labels to detect which changesets were included in the build. It will then look over those changesets for any associated work items and update them to include the build number in which they were fixed.
This tip is also true if you upgrade from TFS2005 to TFS2008. Once the upgrade is complete you should run your builds once manually to check that they are all still working fine and to give a baseline from which changes can be detected.
October 26, 2007
TFS Top Tip #14: The only 2 things you need to know when customizing Team Build
If you are customizing a team build, then there are only two things you need to know to get you started. The rest you can (mostly) figure out from there.
- Your build is defined in a file called TFSBuild.proj for your particular Team Build Type. You probably figured that bit out already. The first thing you need to know is that the TFSBuild.proj file inherits most of its logic from a file called Microsoft.TeamFoundation.Build.targets which lives in
%ProgramFiles%\MSBuild\Microsoft\VisualStudio\TeamBuild\Microsoft.TeamFoundation.Build.targets.
If you open this file in Notepad you can see that it is exceptionally well commented. There is no smoke and mirrors with Team Build, if it happens at all then it triggered by this file. Note that you should never edit the Microsoft.TeamFoundation.Build.targets file. In Team Build 2008 there are so many hook points provided for you to insert your own logic into the build that you should never need to. Microsoft goes to some rather extreme lengths to ensure backwards compatibility with this file (i.e. a TFSBuild.proj file written with the TFS2005 targets file in mind will work just great with the 2008 targets file). If you modify the targets file, not only are you setting your self up for deployment nightmares but you servicing nightmares as well if you attempt to upgrade to later version or even possibly service packs - don't say I didn't tell you ;-) - If you get a bit lost in reading the targets file - the MSDN help for build customizations is pretty good. The best starting point is the page "Understanding Team Foundation Build Configuration Files" - however the pages that this links to that I refer to constantly are Customizable Team Foundation Build Targets and Customizable Team Foundation Build Properties. That said - most of the comments in those MSDN help pages are actually in the targets file itself - just sometimes the property or task you are after is easier to find in the MSDN help.
July 21, 2007
TFS Top Tip #13 - Watch where you drop stuff
With Team Build in Team Foundation Server, you can have multiple build types for multiple projects. For example, we have a build that runs fast that we can have running Continuous Integration on, and a slower build (that does obfuscation, release packaging etc) that is run on demand when we want to perform a release to QA (some of which later go on to become public releases).
A neat feature in the Team Build stuff is that you specify a drop location for your builds and the packaged binaries along with the build log and test results will be placed in a folder corresponding to the build name. In all the demos you see, this will typically be specified as something like \\server\drop and you may well do this yourself at first. Pretty quickly the drop folder will fill up with builds and get confusing.
A better way is a rather simple solution that I almost didn't mention, however when I mentioned this to a friend of mine and it caused some head-slapping, so I thought I'd discuss it here. Apologies if you'd already figured this out this rather basic step.
Simply, put your builds into folders. Something like:-
- \\server\drop\product\buildType\
To give an example:-
- \\jeeves\drop\teamprise\ci
- \\jeeves\drop\teamprise\release
You can obviously take this further if need be. For example we currently have builds going on in two main places, we are putting Teamprise 2.2 through final testing while, in parallel, we work on the next major release in trunk. In the example above, it means we have 4 builds types in total and can follow the convention of \\server\drop\product\branch\buildType to make:-
- \\jeeves\drop\teamprise\2.2\ci
- \\jeeves\drop\teamprise\2.2\release
- \\jeeves\drop\teamprise\trunk\ci
- \\jeeves\drop\teamprise\trunk\release
Pretty simple really, but helps to plan this stuff up front.
January 4, 2007
TFS Top Tip #12 - Specifying a proxy server at the command line
If (like me) you are using the tf.exe command line to access your Team Foundation Server via a Version Control Proxy from a remote office, then the following tip is extremely useful - much more so than my previous registry hack.
There is currently no option with the Microsoft command line to pass a version control proxy server in to TF.exe. It will pick one up if you have one set in the registry if you have used the Team Explorer GUI - but that isn't great for scripted scenarios. James Manning recently pointed me in the direction of an undocumented environment variable called TFSPROXY. If set, the TFS client will use that setting to proxy your requests. Therefore the following will call tf.exe passing a proxy server to use in your connection:-
@echo off
setlocal
set TFSPROXY=http://your_proxy_server:8081
tf %*
endlocal
I saved this in a batch file called "tfvp.cmd" (for "tf via proxy"), therefore if I want to call tf via my proxy and I'm in a shell that doesn't have the environment variable set I can call my script.
The only command that this really useful for is when doing a tfs get command, as only the download is sent via the version control proxy server, the majority of requests go direct to the main Team Foundation Server application tier that you are connected to.
By the way, if you are using the Teamprise command line client then you can use the /proxy:http://your_proxy_server:8081 argument to specify a proxy server to use for the connection, I've just logged a bug so that we will also accept this undocumented environment variable, but we'll make it so that passing one explicitly will override any picked up from the environment variable.
December 12, 2006
TFS Top Tip #11 - Removing source control files from your local file system
One of the questions that came up from one of our users was "how do I delete the files from my local file system - and tell Team Foundation Server that I have done this".
The first thing you might try is to just delete them locally. However, Team Foundation Server (TFS) uses your workspace to keep track of what files you have downloaded and what version you have of them. The reason it does this is so that it can maintain your files without a costly (both in terms of network and CPU processing) sync step. With TFS, when you say "Get latest", you only get the latest version of files that have changed since you last got them. Nothing is downloaded that you don't need (thereby saving you network traffic). A really neat thing about TFS is that if you delete a file on the server and check that delete in, then when somebody does a "Get Latest", the file is deleted on their local system as well - very nice. Moves and renames also exhibit this behavior - really useful for keeping the local file system in sync with the servers.
But, if you have deleted a file locally (using Windows Explorer for example) then do a "Get Latest" the file is not downloaded - because the server thinks you already have it. You can easily download the file by going to "Get Specific Version..." and selecting the "Force get" option - which will download all files, regardless of if the server things you have them or not.
The question I was asked was how to tell the server you have removed the file from your system, without deleting it from the server. In the end, it took me a while to figure out the answer (and the help of Buck Hodges)
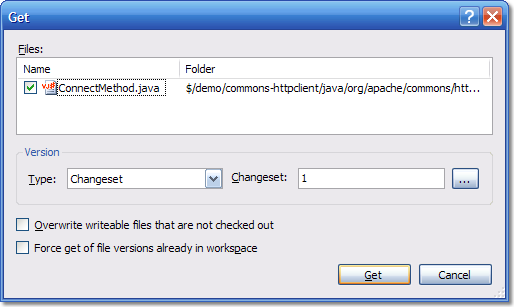
The answer is, if you do a "Get Specific Version..." on the files, and select Changeset 1, the files will be deleted locally and the server will know this. The color of the file in the Source Control explorer will go from black to gray and will have the phrase "Not downloaded" in the latest column.
Changeset 1 is a special changeset on your Team Foundation Server instance. It was created as part of the setup routine and only contains one thing - the root node ($/) in your source control tree. If you do a get for changeset 1 on any actual files then they will not exist at that point in time on the system so will be deleted locally and the server will know this.
Anyway, I thought this worthy of a TFS Tip post. Not only because it highlights how to do something that is non-obvious, but also because once you understand how it works, you will understand a large part of what you need to know about Team Foundation Server Source Control.
October 5, 2006
TFS Top Tip #10 - Keep Your Shelves Tidy
Team Foundation Server source control has a great feature called Shelving. Shelving lets you set store a batch of pending changes onto the server and optionally remove them from your local workspace. It comes in really handy for the times when you want to backup your code and store it on the server but don't want to commit it to source control. I also sometimes use it when I would like a remote colleague to take a look at some code I have written before I commit it into the code base. For more information about Shelving, see the MSDN documentation. A Shelveset is identified by developer and the name the developer gave it when shelving.
One of the features of shelving (and how it differs from working in a private developer branch) is that a Shelveset is in itself not versioned. If the same developer saves a Shelveset with the same name, then it will overwrite the previous Shelveset. This comes in really handy when you have a Shelveset that you commonly use for one thing - for example, I have a Shelveset that I normally call "Work In Progress" (actually, I normally call it "wip" because I am lazy when it comes to typing, but you get the idea). If I need to stop work, but I haven't been able to get to a point where I can check-in the code, then I shelve the pending changes and call the Shelveset "Work In Progress". That way, I only have one of these and I know the purpose of it.
However, most of the time when you shelve, it is a temporary thing. You create a Shelveset and then you unshelve it - and then you no longer want it. The old shelvesets will sit on your shelf gathering dust until you tidy them up by deleting them. The unshelve dialog has a "Delete" button that you can use to delete a particular shelveset.
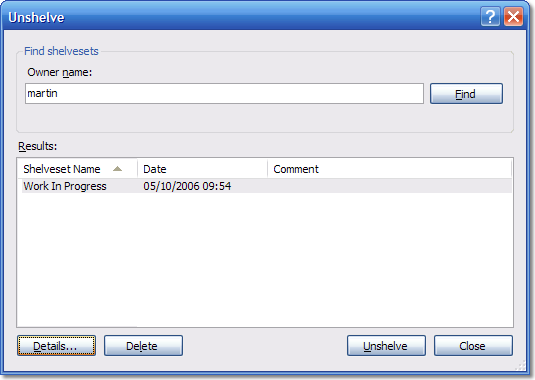
Additionally, if you press "Details", then you get to see more information about the shelveset in question - but you also get a couple of other options controlling the behavior that occurs while the unshelve is being performed:-
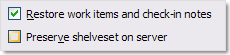
If you un-check the "Preserve shelveset on server" check-box then your shelveset will be automatically deleted after you successfully unshelve it - which is a quite handy (if slightly hidden) feature.
It's good practice to delete the shelvesets when you no longer need them. Not only will it get rid of clutter for you, it will also help when another person is trying to unshelve something that you have placed there for them.
September 18, 2006
TFS Top Tip #9 - Secret Registry Hacks
So, this isn't exactly original material - but I was having a chat with somebody today who I consider very knowledgeable about Visual Studio Team System and they were not aware of these so hopefully re-posting some will help more people discover them. Strictly speaking, as all of these have been mentioned somewhere before the word "Secret" isn't correct - however it gave an otherwise very dull post a certain bit of excitement which kept you reading this far so forgive me. The usual Caveats about messing with the registry apply, also the default settings are generally more logical to new users so use with caution. Most of these tips apply to HKEY_LOCAL_MACHINE as well as HKEY_CURRENT_USER - I normally set them as a user preference so as not to confuse anyone else that should happen to use my machine.
Hack #1 - Stopping Team Explorer from connecting on Visual Studio 2005 Start-up
Add a DWORD value called "AutoLoadServer" under HKEY_CURRENT_USER\Software\Microsoft\VisualStudio\8.0\TeamFoundation. Zero means do not reconnect automatically.
I first read about this setting over at Tim Noonan's blog. This can be very handy if, like me, you frequently change TFS servers. I jump between the work TFS instance, CodePlex and a test or VPC versions of TFS. I know which server I want to connect to when starting VS 2005, and frequently it is not the one I connected to last time. Adding the following setting means that I have to manually pick the server I want to connect to from the "Add Existing Project..." button.
Hack #2 - Don't get Missing Files
Add a DWORD value called DisableGetMissingFiles under HKEY_CURRENT_USER\Software\Microsoft\VisualStudio\8.0\TeamFoundation\SourceControl. Any value other than zero will disable getting files from the server automatically.
Another Tim Noonan special. This setting determines if files missing from the solution or project are automatically downloaded. I normally switch this off and so get the files only when I say "Get Latest" on a particular solution or project, this is especially useful when you are not always connected.
Hack #3 - Bypass proxy server
Add a String value called BypassProxyOnLocal under HKEY_CURRENT_USER\Software\Microsoft\VisualStudio\8.0\TeamFoundation\RequestSettings. A value of "true" will bypass.
This one from the legendry Buck Hodges. In some network configurations, the Microsoft Team Foundation Server client will connect to your Team Foundation Server via a web proxy server. This should be avoided as it slows everything down and the NTLM authentication used by TFS doesn't play well with some proxy configurations. I've seen this pop up as a problem with environments that use a proxy.pac file to control proxy access rather than hard-coding the entries in the Internet Options, LAN Settings (or for folks that don't have Bypass local set up). You should probably only use this setting if you know you are having this problem (often diagnosed by an intermittent failure of Team Explorer to connect but easily checked using a network sniffing tool such as Ethereal).
Hack #4 - TFS Version Control Proxy Settings
See HKEY_CURRENT_USER\Software\Microsoft\VisualStudio\8.0\TeamFoundation\SourceControl\Proxy. A String value called Url containing the proxy address and a String value called Enabled set to true will enable the source control proxy.
The easier way to enter values for what machine to use as a TFS Version Control Proxy is to go to into Visual Studio with Team Explorer installed and select Options, Source Control, Tools, Options, Source Control, Visual Studio Team Foundation Server, Proxy Settings. However, if you are running a tf.exe script or TFS .NET API code as part of a service and you want the code to go via a proxy then the HKEY_LOCAL_MACHINE version of this setting is very useful for setting a default.
Hack #5 - Configuring the TreeDiff Power Toy
See Brian Harry's excellent post about some registry tweaks for Configuring the TreeDiff Power Toy to your whim.
August 31, 2006
TFS Top Tip #8 - Where to get help
Recently, I've had a surge of emails asking various questions about Team Foundation Server and how to do certain things. While I always (eventually) respond, it can sometimes take me a while. If you have questions about Team Foundation Server then the best place to go is the MSDN forums. These forums are monitored by the VSTS team as well as by the Team System MVP's and other folks who know stuff about the product. Unlike a lot of newsgroups, these forums are actually a very welcoming and friendly place to ask questions. I personally hang out on the following forums:-
- Team Foundation Server - General
- Team Foundation Server - Setup
- Team Foundation Server - Version Control
- Team Foundation Server - Work Item Tracking
- Team Foundation Server - Administration
- Team Foundation Server - Build Automation
- Team Foundation Server - Process Templates
- Team Foundation Server - Reporting
- Visual Studio Team System - General
- Visual Studio Team System - Developers
As well as the official MSDN forums, you can also try one of the community ones. These don't tend to get the traffic from Team folks but are still good resources. It's also a good place to ask questions that you might not want to ask on a Microsoft resource (such as how does TFS stack up against Product B) and get an answer from somebody who is not paid by Microsoft.
- Team System Rocks (excellent community resource site)
- TeamFoundationServer.org (a new UK based resource)
At Teamprise we also have our own forum and knowledge base that are worth checking out if the question is related to use of Team Foundation Server from Java or on the Unix / Mac / Linux platforms.
Before you ask the question, it is probably worth checking the MSDN documentation first or using your favorite search engine, but don't worry about asking if you can't find your answer - the folks on these forums are always happy to point you to the best resource.
You never know, if you ask a question on these forums then you might still get me answering it if you are unlucky enough. By asking the question in a public forum you are doing a service for the next person that comes down the line with the same problem as they'll be able to see somebody else with the same issue and (hopefully) the answer.
July 6, 2006
TFS Top Tip #7 - Determine when TFS Trial Edition will expire
UPDATE: Brian Harry has posted a new utility to help you determine the trial expiration dates on your server. View Brian's post for more details.
Like a lot of early adopters, we installed the Team Foundation Server 180–day trial edition so that we could use is right away while we were waiting for our TFS license key.
Anyway, if you want to know what the installation date of your TFS server is then the easiest way is to type the following command in a Visual Studio 2005 command prompt:-
tf changeset 1 /server:http://servername:8080 /noprompt
Where servername is your TFS instance. I get the following result:-
Changeset: 1
User: tfssetup
Date: 20 February 2006 19:57:54
Comment:
Items:
  add $/
During the installation, Team Foundation Server creates the root branch of the source tree and this is the first changeset on your system. If you add 180 days to this date then you get when your trial will expire.
Now, in my case it is even more confusing. I installed the Release Candidate of TFS on February 20th, and then upgraded to the 180–day trial edition of TFS on March 21st. A fact that I can tell from my installation log file located on the Team Foundation Server in the following directory:-
C:\Program Files\Microsoft Visual Studio 2005 Team Foundation Server\Microsoft Visual Studio 2005 Team Foundation Server - ENU\Logs
Which date will be used for the expiry of my server? Well at the moment I have no idea, so I am assuming the earlier of these dates will be used just in case…
However, for most people who went straight to the 180–day trial, the command at the top of this post will give them the date of initial install.
June 26, 2006
TFS Top Tip #6 - Setting the Maximum Attachment Size for Work Items
By default, the maximum attachment size for attachments to work items in Team Foundation Server is 4Mb. It is handy that this feature exists because people may accidentally attach massive files when they should really be attaching something a little smaller. However – for some people 4Mb is just not enough and they want more (or even less).
To do this, you can use one of the WIT Web services that isn’t exposed via the object model. The easiest way is to log on to the Team Foundation Server as an administrator and then fire up the following in Internet Explorer:-
http://localhost:8080/WorkItemTracking/v1.0/ConfigurationSettingsService.asmx?op=SetMaxAttachmentSize
In the “maxSize” box, enter the required size in bytes. The maximum size for MaxSize is 2Gb, but you probably want to keep it smaller than that unless you really need people attaching VPC images to your work items :-) Note that this setting is applied server wide (across all Team projects). See MSDN Help for more information (and thanks to Mohammad Iqubal for posting a link to the help in the MSDN Forums).
May 19, 2006
TFS Top Tip #5 - What to do if you lock yourself out of your repository
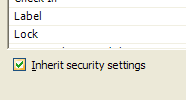 This tip is a follow up from my rather less helpful post “Don’t Do That” where I discussed the “Inherit security settings” option in the security settings tab for the Source Control Explorer when talking to Team Foundation Server. The issue with this check-box is that if you un-tick it then all the settings for every group on that folder are removed meaning that you have to go through every group and make sure that they have the correct permissions before you press the OK button. Even if you are a project administrator and you un-tick this box and press OK without giving project administrators rights to the folder or file you will not be able to go back and adjust the permissions.
However, I have found a work around should you be left stranded in this way. If you log in to TFS with the credentials of somebody who is a local administrator on the server then you will be able to view the folder and reset the security permissions. The easiest way to do this is to log on locally to your TFS application tier machine as the TFSSetup user and use the source control explorer on that machine to rectify the problem. Obviously it is not ideal but at least you are not totally stranded.
Rather embarrassingly, I found this work-around totally by accident while up on stage presenting my recent talk “Top Ten Tips for Team Foundation Server”. My finale was going to be trashing my TFS installation by un-ticking this box and pressing OK without giving the Project Administrators the appropriate rights – however it wasn’t as dramatic as I’d planned. Turns out that this was because I was also the TFSSetup user on the VPC I was using as the TFS server. At least next time I can make it dramatic and then show folks how to fix it!
April 28, 2006
TFS Top Tip #4: The Command Line Client is your friend.
If you are going to be doing more than the basic check-in / check-out options then it pays to get to know the command line client – tf. The command line client is actually the most flexible and powerful client to Team Foundation Version Control.
For more information, consult the MSDN help documentation. Teamprise users will be glad to hear that a large percentage of the commands are implemented in V1.0 of our command line client meaning that you can do these actions from a Mac or Unix box as well (install instructions are posted in the Knowledge Base). If you are running on Windows then you are probably better off sticking to Microsoft’s command line client that gets installed as part of the Team Foundation Server client installation (and accessible via a Visual Studio 2005 command shell).
For example, to show all the check-outs by everyone on a path in the repository:-
tf status /server:http://yourservernamehere:8080 /user:* /recursive $/TeamProject/
For more examples, see an excellent post from James Manning or some of my previous posts:-
- Hatteras Command Line Tips (from back when tf.exe was called h.exe which saved a keypress :-), however the documentation was no where near as good as it is now )
- Unlocking files in VSTS
The command line client is also excellent for scripting purposes (our automated build system relies heavily on it). I urge you to spend a few moments with a strong cup of coffee, the help documentation and just have a play around. Once you realise what commands are available then you’ll know what’s possible if you come across a situation in the future where you reach limitations in the UI.
April 27, 2006
TFS Top Tip #3: Removing the Resolve Check-In Action from a Work Item
I don’t know about you, but I love associating my check-ins with work items using the Pending Changes view, it makes it so easy to maintain requirements traceability and helps me feel less guilty as I’m doing one more thing that I should have been doing for years.
The only problem with the default definitions for Bug and Task are that if you select the item then by default the “Resolve” check-in action is selected. This is annoying for me as it the action I want to take in probably about 5% of check-ins. 95% of the time I just want to associate and 90% of the time I forgot that I have to change the default setting and end up going back to the work item and re-activating it.
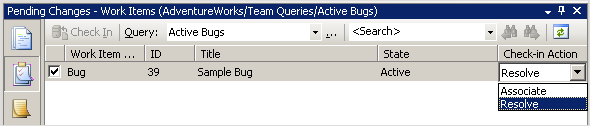
The “Resolve” option is displayed when a state transition in the work item’s workflow is defined as having an action defined for check-in. Below is the transition section from the MSF Agile Bug:-
<REASONS>
<DEFAULTREASON value="Fixed" />
<REASON value="Deferred" />
<REASON value="Duplicate" />
<REASON value="As Designed" />
<REASON value="Unable to Reproduce" />
<REASON value="Obsolete" />
</REASONS>
<FIELDS>
<FIELD refname="System.AssignedTo">
<COPY from="field" field="System.CreatedBy" />
</FIELD>
<FIELD refname="Microsoft.VSTS.Common.ActivatedDate">
<READONLY />
</FIELD>
<FIELD refname="Microsoft.VSTS.Common.ActivatedBy">
<READONLY />
</FIELD>
<FIELD refname="Microsoft.VSTS.Common.ResolvedBy">
<COPY from="currentuser" />
<VALIDUSER />
<REQUIRED />
</FIELD>
<FIELD refname="Microsoft.VSTS.Common.ResolvedDate">
<SERVERDEFAULT from="clock" />
</FIELD>
</FIELDS>
<ACTIONS>
<ACTION value="Microsoft.VSTS.Actions.Checkin" />
</ACTIONS>
</TRANSITION>
If you remove the actions section from the transition from Active to Resolved transition then the only check-in action available will be “Associate”. Admittedly, this means that I have to edit the work item after finishing checking in files to move it from Active to Resolved – but I find this works better for me. I usually leave a little comment in the history as I change the state to say (at a high level) what I did and in the case of bugs any help I need to give to help the fix be verified by the test verification team.
April 26, 2006
TFS Top Tip #2: Changing the Logged In User
 When you connect to a Team Foundation Server, the Microsoft client API attempts to connect with your current credentials that the process is running with under Windows. If you are on a different domain than your TFS server or the user that you are logged in with does not have access, then you will be prompted to enter your login credentials using the standard login dialog box that you will be familiar with from Internet Explorer.
However, what if you pass credentials and now you would like to pass in a different set. In Teamprise it is easy enough because we have to ask you them every time you connect. With the Microsoft API your credentials are cached in the standard windows store.
To access this store (and remove your cached credentials allowing you to re-authenticate as a different user) then go to Control Panel, User Accounts, Advanced Tab, Manage Passwords. You should then locate your TFS Server instance and select Remove.
April 25, 2006
TFS Top Tip #1 - WIQL Seperators
I thought I’d try and post some quick Top Tips for Team Foundation Server – in no particular order apart from as I think of them. Today, this came up in the forums so I thought I’d elaborate.
WIQL (pronounced Wickle), stands for Work Item Query Language and is what is used when talking to the work item store in Team Foundation Server. It has a SQL like construct and is used to pass queries to the server. Visual Studio 2005 comes with a Query Editor that generate WIQL. While the query editor is straightforward, it is pretty powerful and allows you to do most things.
However, the query editor is region sensitive which sometimes causes confusion. Take the following example where I am using an “IN” statement to list a set of values for the work item status:-
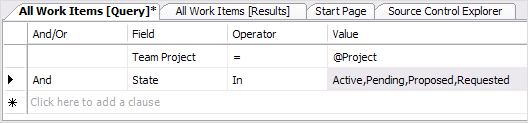
Note that the values are separated by commas. Those of you from a SQL background find this very sensible, but what the query editor is actually doing is taking the list of values and converting them into the following WIQL statement:-
FROM WorkItems
WHERE [System.TeamProject] = @project
AND [System.State] IN ('Active', 'Pending', 'Proposed', 'Requested')
ORDER BY [Microsoft.VSTS.Common.Rank], [System.WorkItemType], [System.Id]
(A top sub-tip is that it is possible to save WIQL files from Visual Studio by editing the query then selecting File, Save Query As.. and then select file. To run a saved query from the file system double click the *.wiq file from explorer)
The comma separator used by the query editor is actually being picked up from the “List separator” of your regional settings (shown below) (Start, Control Panel, Regional Settings, Customize…)

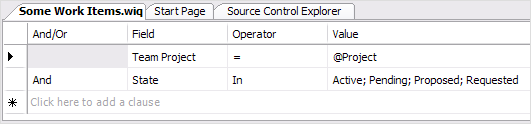
If you are in one of the many regions of the world that use a different list separator then you have to use that in the Visual Studio 2005 Query Editor. For example, if I change my list separator to be a semi-colon and then re-edit the query in the Visual Studio 2005 Query Editor I get the following:-
This behaviour has some interesting side effects. Remember when I said that the Visual Studio 2005 Query Editor “allows you to do most things”. Well, one small problem is forcing the editor to take a character to say that you want the following to be treated as a string. For example, if you have a comma in the text value you are trying to use in an “IN” statement then you are hosed because the query editor assumes that this is a new value in your list. For example, if you try the following:

This actually gets translated by the query editor as the following:
FROM WorkItems
WHERE [System.TeamProject] = @project
AND [System.AssignedTo] IN ('''Woodward', 'Martin''', '''Sell', 'Clark''')
ORDER BY [Microsoft.VSTS.Common.Rank], [System.WorkItemType], [System.Id]
As you can tell, it parses on the commas first, which is not want you wanted at all. If you manually type in the WIQL correctly as IN (‘Woodward, Martin’, ‘Sell, Clark’) then the query editor will display this as Woodward, Martin, Sell, Clark – which in turn gets treated as IN (‘Woodward’,’Martin’,’Sell’,’Clark’) when the WIQL is generated by the editor.
Hey ho – Clark Sell has a post about changing the regional settings to enable to to query assigned to names but be warned it may have nasty side effects in other programs on your machine.
Hmm. When I thought about posting a TFS Tip a day for the next couple of weeks I didn’t intend them to be this long. Expect the next one to be more concise…
Now playing: Carl Franklin - Avalon, AJAX, Vista, and more with Tim Huckaby
